Preparing Your Mac to Create a Bootable USB Drive
Creating a bootable USB drive on Mac can be a helpful skill to have, whether you need to install macOS or troubleshoot issues. In this step-by-step guide, we’ll show you how to create a bootable USB drive on Mac and provide helpful tips along the way.
What you need?
- The ISO image of the operating system you want to install on the USB drive.
- A USB drive with sufficient capacity for the task. The capacity will depend on the content you want to copy to it.
Process
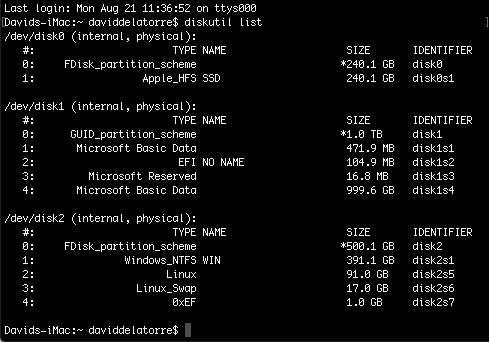
Open a terminal and enter the following command to obtain the list of disks:
diskutil list
This will show you a list of the mounted devices and disks in your system, as well as information about the partitions of each one.

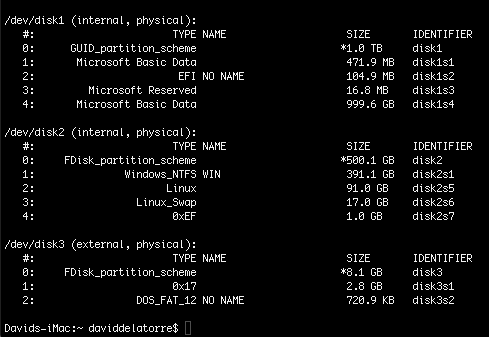
Connect your USB and run the command again. You will see a new device at the bottom of the list that corresponds to your USB drive. In my case, it is /dev/disk3.
Note: It is very important not to confuse this directory with another, as all data on the device will be erased in this process.

Unmount the USB device (in my case, /dev/disk3) with the following command – but be sure to verify the directory of your device before copying:
diskutil unmount /dev/diskn
Navigate to the directory where the OS image is located using the cd command, and enter the following instruction – again, verifying the directory:
sudo dd if=imagen_del_SO.iso of=/dev/diskn bs=1m
Note: Increasing the block size (bs) will increase the write speed of the process but also increase the possibility of failure. Using the given value will produce a correct and consistent image.
Creating the image on the USB drive may take a considerable amount of time, up to one and a half or two hours. The dd command does not provide information until the process is complete, and the time will depend on the size of the content to be copied, the speed of the USB device, and the port it is connected to. Be patient!
Once the process is complete, the terminal will show something like this:
2911+1 records in
2911+1 records out
3053371392 bytes transferred in 2151.132182 secs (1419425 bytes/sec)
And that’s it! You can now safely remove the USB device, which is perfectly configured and ready to use.
If you have any questions about the process or any other topic, do not hesitate to contact me through the comments or the contact form provided on the website. Best regards and see you next time.